Contributing
Contributions to the ESPHome suite are very welcome! All the code for the projects is hosted on GitHub and you can find the sources here:
ESPHome (Project Source Code)
ESPHome-Docs (The documentation which you’re reading here)
Just clone the repository locally, do the changes for your new feature/bug fix and submit a pull request.
Contributing to ESPHome-Docs
One of the areas of ESPHome that can always be improved is the documentation. If you see an issue somewhere, a spelling mistakes or if you want to share your awesome setup, please feel free to submit a pull request.
The ESPHome documentation is built using sphinx and uses reStructuredText for all source files.
If you’re not familiar with writing rST, see Syntax for a quick refresher.
Through Github
This guide essentially goes over the same material found in GitHub’s Editing files in another user’s repository. You may also find that page helpful to read.
At the bottom of each page in the docs, there is a “Edit this page on GitHub” link. Click this link and you’ll see something like this:
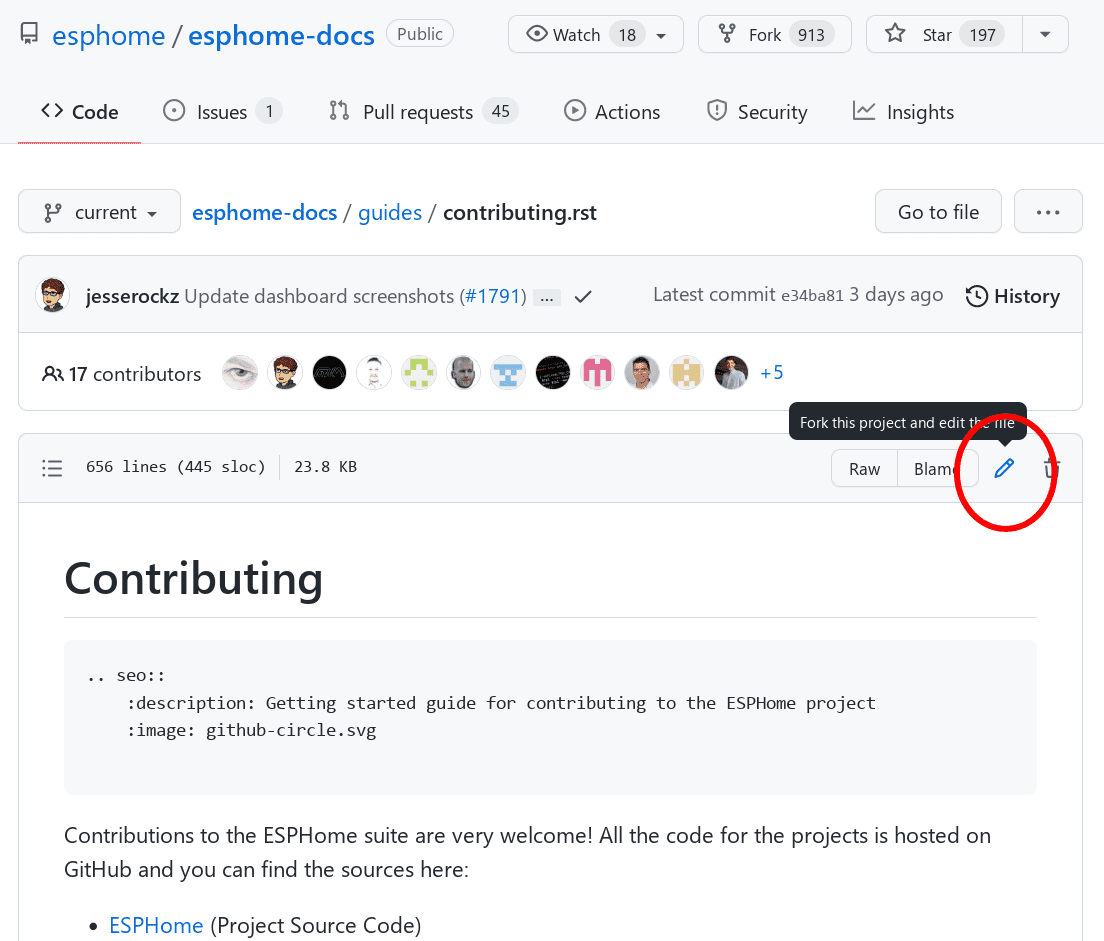
Click the edit button to start making changes. If you’re not sure about some element of syntax, see the quick-start Syntax guide.
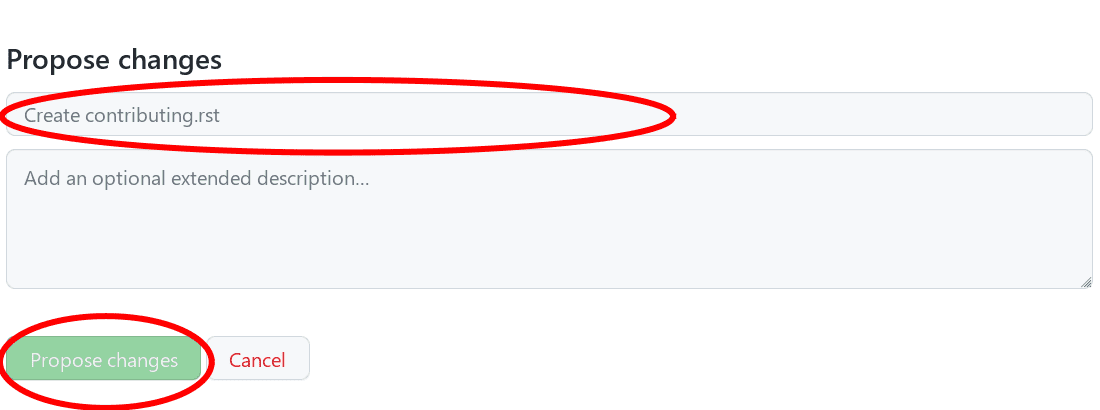
Once you’ve made your changes, give them a useful name and press “Propose changes”. At this point, you’ve made the changes on your own personal copy of the docs in GitHub, but you still need to submit them to us.
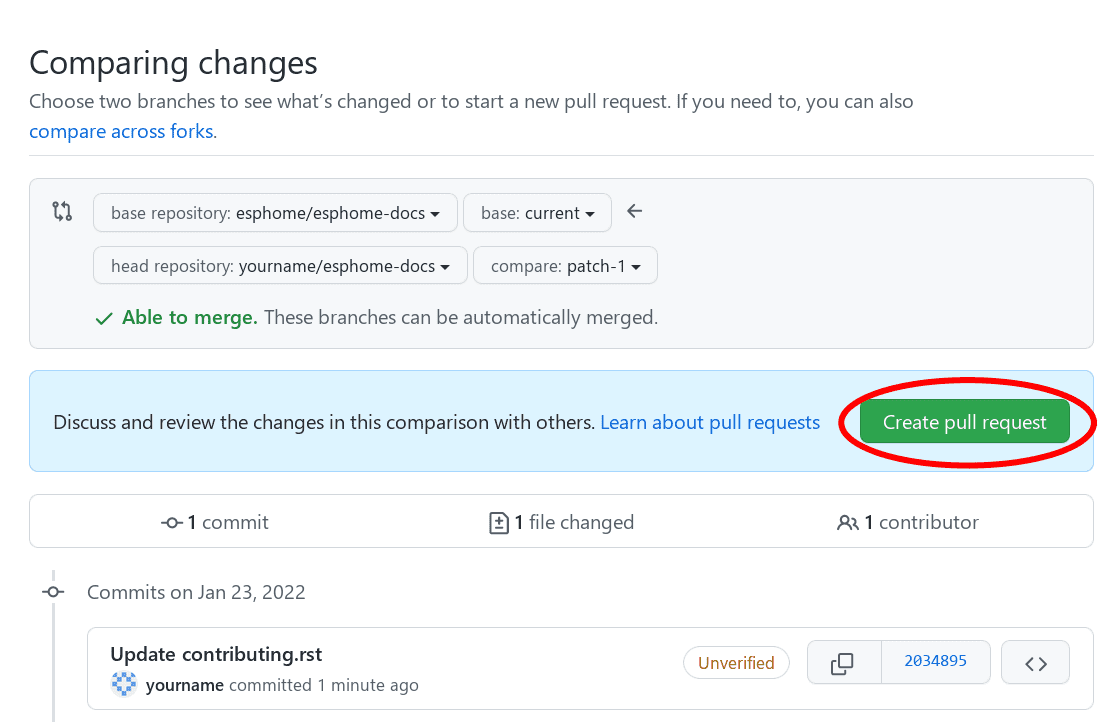
To do that, you need to create a “Pull request”:
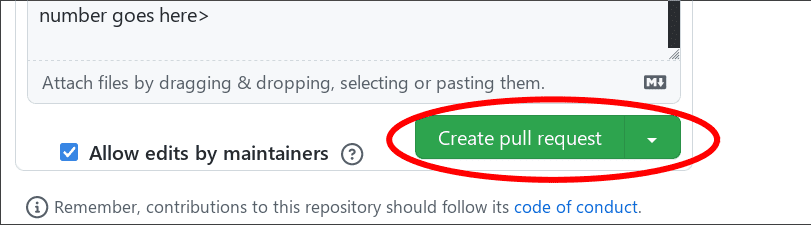
Fill out the new pull request form, replacing the [ ] with [x] to indicate that you have followed the instructions.
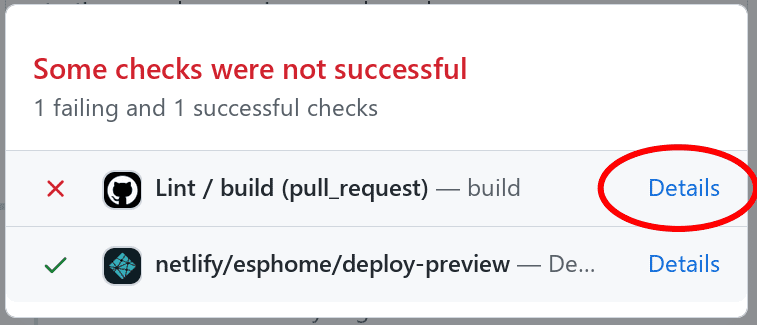
After waiting a while, you might see a green or a red mark next to your commit in your pull request:

This means that there is some error stopping your pull request from being fully processed. Click on the X, click on “Details” next to the lint step, and look and see what’s causing your change to fail.
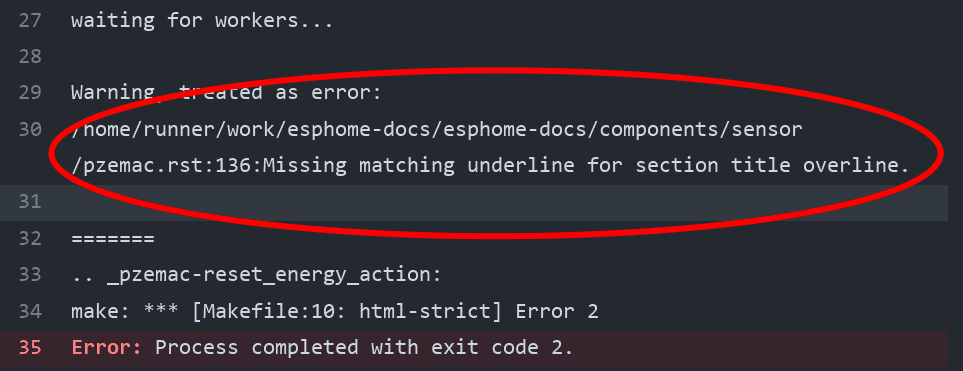
For example, in this case, you’d want to go to line 136 of pzemac.rst and adjust the number of === so that it completely underlines the section heading.
Once you make that change, the pull request will be built again, and hopefully this time where will be no other errors.
Build
Note
The easiest way is to use the esphome-docs container image:
docker run --rm -v "${PWD}/":/workspaces/esphome-docs -p 8000:8000 -it ghcr.io/esphome/esphome-docs
With PWD referring to the root of the esphome-docs git repository. Then go to <CONTAINER_IP>:8000 in your browser.
This way, you don’t have to install the dependencies to build the documentation.
To check your documentation changes locally, you first need install Sphinx (with Python 3).
# in ESPHome-Docs repo:
pip install -r requirements.txt
Then, use the provided Makefile to build the changes and start a live-updating web server:
# Start web server on port 8000
make live-html
Notes
Some notes about the docs:
Use the English language (duh…)
An image tells a thousand words, please use them wherever possible. But also don’t forget to shrink them, for example I often use https://tinypng.com/
Try to use examples as often as possible (also while it’s great to use highly accurate, and domain-specific lingo, it should not interfere with new users understanding the content)
Fixes/improvements for the docs themselves should go to the
currentbranch of the esphomedocs repository. New features should be added against thenextbranch.Always create new branches in your fork for each pull request.
Syntax
Here’s a quick RST primer:
Title hierarchy is based on order of occurrence, not on type of character used to underline it. This documents establish the following character order for better consistency.
Headers: You can write titles like this:
My Title
========
and section headers like this:
My Sub Section
--------------
and sub-section headers like this:
My Sub-sub Section
******************
Note
The length of the bar below the text must match the title Text length. Also, titles should be in Title Case
Links: To create a link to an external resource (for example https://www.google.com), use
\`Link text <link_url>\`__. For example:`Google.com <https://www.google.com>`__
References: To reference another document, use the
:doc:and:ref:roles (references are set up globally and can be used between documents):.. _my-reference-label: Section to cross-reference -------------------------- See :ref:`my-reference-label`, also see :doc:`/components/switch/gpio`. :doc:`Using custom text </components/switch/gpio>`.
See Supported Microcontrollers, also see GPIO Switch. Using custom text.
Inline code: To have text appear
like this, use double backticks:To have text appear ``like this``, use double backticks.To have text appear
like this, use double backticks.Code blocks: To show a sample configuration file, use the
code-blockdirective:.. code-block:: yaml # Sample configuration entry switch: - platform: gpio name: "Relay #42" pin: GPIOXX
# Sample configuration entry
switch:
  - platform: gpio
    name: "Relay #42"
    pin: GPIOXX
Note
Please note the empty line after the
code-blockdirective. That is necessary.Images: To show images, use the
figuredirective:.. figure:: images/dashboard_states.png :align: center :width: 40.0% Optional figure caption.
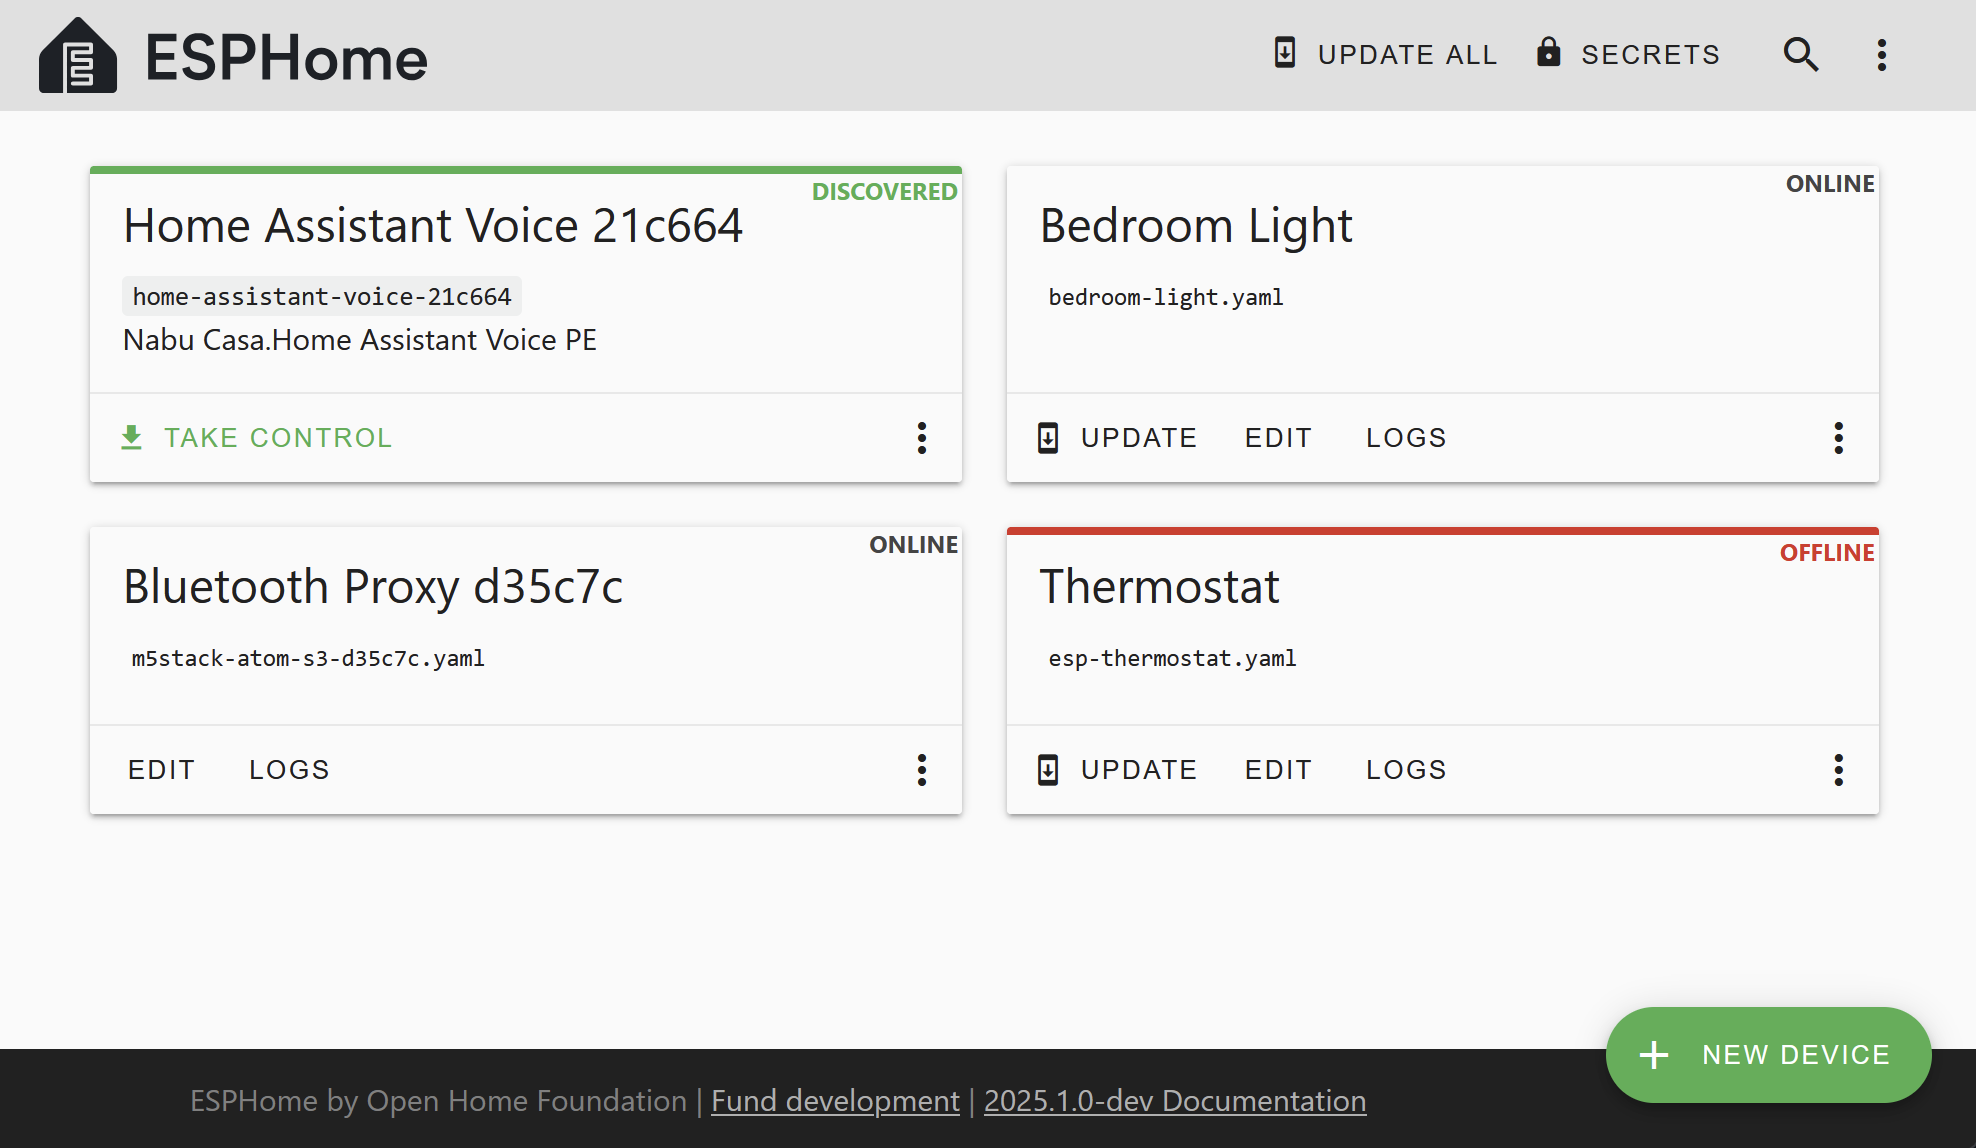
Optional figure caption.
Note
All images in the documentation need to be as small as possible to ensure fast page load times. For normal figures the maximum size should be at most about 1000x800 px or so. Additionally, please use online tools like https://tinypng.com/ or https://tinyjpg.com/ to further compress images.
Notes and warnings: You can create simple notes and warnings using the
noteandwarningdirectives:.. note:: This is a note. .. warning:: This is a warning.
Note
This is a note.
Warning
This is a warning.
Italic and boldface font families: To italicize text, use one asterisk around the text. To put a strong emphasis on a piece of text, put two asterisks around it.
*This is italicized.* (A weird word...)
**This is very important.**
This is italicized. (A weird word…) This is very important.
Ordered and unordered list: The syntax for lists in RST is more or less the same as in Markdown:
- Unordered item

  - Unordered sub-item

- Item with a very long text so that it does not fully fit in a single line and
  must be split up into multiple lines.

1. Ordered item #1
2. Ordered item #2
Unordered item
Unordered sub-item
Item with a very long text so that it does not fully fit in a single line and must be split up into multiple lines.
Ordered item #1
Ordered item #2
imgtable: ESPHome uses a custom RST directive to show the table on the front page (see index.rst). New pages need to be added to the
imgtablelist. The syntax is CSV with <PAGE NAME>, <FILE NAME> (without RST), <IMAGE> (in top-level images/ directory), <COMMENT> (optional - short text to describe the component). The aspect ratio of these images should be 8:10 (or 10:8) but exceptions are possible.Because these images are served on the main page, they need to be compressed heavily. SVGs are preferred over JPGs and JPGs should be max. 300x300px. If you have imagemagick installed, you can use this command to convert the thumbnail:
convert -sampling-factor 4:2:0 -strip -interlace Plane -quality 80% -resize 300x300 in.jpg out.jpg
reStructured text can do a lot more than this, so if you’re looking for a more complete guide please have a look at the Sphinx reStructuredText Primer.
Setting Up Development Environment
For developing new features to ESPHome, you will first need to set up a development environment.
This is only possible for pip installs.
# Clone repos
git clone https://github.com/esphome/esphome.git
git clone https://github.com/esphome/esphome-docs.git

# Install ESPHome
cd esphome/
script/setup
# Start a new feature branch
git checkout -b my-new-feature
cd ..
The environment is now ready for use, but you need to activate the Python virtual environment every time you are using it.
# Activate venv
source venv/bin/activate
Now you can open ESPHome in your IDE of choice (mine is CLion) with the PlatformIO addons (see PlatformIO docs for more info). Then develop the new feature with the guidelines below.
All PRs are automatically checked for some basic formatting/code mistakes with Github Actions. These checks must pass for your PR to be mergeable.
Setting Up Git Environment
ESPHome’s code-base is hosted on GitHub, and contributing is done exclusively through “Pull Requests” (PRs) in the GitHub interface. So you need to set up your git environment first.
When you want to create a patch for ESPHome, first go to the repository you want to contribute to (esphome, etc) and click fork in the top right corner. This will create a fork of the repository that you can modify and create git branches on.
# Clone your fork
git clone https://github.com/<YOUR_GITHUB_USERNAME>/<REPO_NAME>.git
# For example: git clone https://github.com/OttoWinter/esphome.git

# To continue you now need to enter the directory you created above
cd <REPO_NAME>
# For example: cd esphome

# Add "upstream" remote
git remote add upstream https://github.com/esphome/<REPO_NAME>.git
# For example: git remote add upstream https://github.com/esphome/esphome.git

# For each patch, create a new branch from latest dev
git checkout dev
git pull upstream dev
git checkout -b <MY_NEW_FEATURE>
# For example: git checkout -b gpio-switch-fix

# Make your modifications, then commit changes with message describing changes
git add .
git commit -m "<COMMIT_MESSAGE>"
# For example: git commit -m "Fix GPIO Switch Not Turning Off Interlocked Switches"

# Upload changes
git push -u origin <BRANCH_NAME>
# For example: git push -u origin gpio-switch-fix
Then go to your repository fork in GitHub and wait for a create pull request message to show up in the top (alternatively go to branches and create it from there). Fill out the Pull Request template outlining your changes; if your PR is not ready to merge yet please mark it as a draft PR in the dropdown of the green “create PR” button.
Review Process: ESPHome’s code base tries to have a high code standard. At the bottom of the Pull Request you will be able to see the “Github Actions” continuous integration check which will automatically go through your patch and try to spot errors. If the CI check fails, please see the Github Actions log and fix all errors that appear there. Only PRs that pass the automated checks can be merged!
Catching up with reality: Sometimes other commits have been made to the same files you edited. Then your changes need to be re-applied on top of the latest changes with a “rebase”. More info here.
# Fetch the latest upstream changes and apply them
git fetch upstream dev
git rebase upstream/dev
Contributing to ESPHome
This is a guide to contributing to the ESPHome codebase. ESPHome uses two languages for its project: Python and C++.
The user configuration is read, validated and transformed into a custom firmware with the Python side of the firmware.
The C++ codebase is what’s actually running on the ESP and called the “runtime”. This part of the codebase should first set up the communication interface to a sensor/component/etc. and communicate with the ESPHome core via the defined interfaces (like Sensor, BinarySensor, Switch).
1. Directory Structure
After you’ve set up development environment, you will have a folder structure like this:
esphome
├── __main__.py
├── automation.py
├── codegen.py
├── config_validation.py
├── components
│   ├── __init__.py
│   ├── dht12
│   │   ├── __init__.py
│   │   ├── dht12.cpp
│   │   ├── dht12.h
│   │   ├── sensor.py
│   ├── restart
│   │   ├── __init__.py
│   │   ├── restart_switch.cpp
│   │   ├── restart_switch.h
│   │   ├── switch.py
│  ...
As you can see, all components are in the “components” folder. Each component is in its own subfolder which contains the Python code (.py) and the C++ code (.h and .cpp).
Suppose the user types in the following:
hello1:

sensor:
  - platform: hello2
In both cases, ESPHome will automatically look for corresponding entries in the “components”
folder and find the directory with the given name. For example the first entry will make ESPHome
look at the esphome/components/hello1/__init__.py file and the second entry will result in
esphome/components/hello2/sensor.py.
Let’s leave what’s written in those files for (2.), but for now you should also know that whenever a component is loaded, all the C++ source files in the folder of the component are automatically copied into the generated PlatformIO project. So you just need to add the C++ source files in the folder and the ESPHome core will copy them with no additional code required by the component developer.
Note
For testing you can use External Components.
ESPHome also has a custom_components mechanism like Home Assistant does. However this is
discouraged in favor of External Components.
2. Config Validation
The first thing ESPHome does is read and validate the user config. For this ESPHome has a powerful “config validation” mechanism. Each component defines a config schema that is validated against the user config.
To do this, all ESPHome Python modules that can be configured by the user have a special field
called CONFIG_SCHEMA. An example of such a schema is shown below:
import esphome.config_validation as cv

CONF_MY_REQUIRED_KEY = 'my_required_key'
CONF_MY_OPTIONAL_KEY = 'my_optional_key'

CONFIG_SCHEMA = cv.Schema({
  cv.Required(CONF_MY_REQUIRED_KEY): cv.string,
  cv.Optional(CONF_MY_OPTIONAL_KEY, default=10): cv.int_,
}).extend(cv.COMPONENT_SCHEMA)
This variable is automatically loaded by the ESPHome core and validated against. The underlying system ESPHome uses for this is voluptuous. Going into how to validate is out of scope for this guide, but the best way to learn is to look at examples of how similar components validate user input.
A few point on validation:
ESPHome puts a lot of effort into strict validation - If possible, all validation methods should be as strict as possible and detect wrong user input at the validation stage (and not later).
All default values should be defined in the schema (and not in C++ codebase or other code parts).
Config keys should be descriptive - If the meaning of a key is not immediately obvious you should always prefer long_but_descriptive_keys.
3. Code Generation
After the user input has been successfully validated, the last step of the Python codebase is called: Code generation.
As you may know, ESPHome converts the user’s configuration into C++ code (you can see the generated
code under <NODE_NAME>/src/main.cpp). Each component must define its own to_code method
that converts the user input to C++ code.
This method is also automatically loaded and invoked by the ESPHome core. An example of such a method can be seen below:
import esphome.codegen as cg

def to_code(config):
    var = cg.new_Pvariable(config[CONF_ID])
    yield cg.register_component(var)

    cg.add(var.set_my_required_key(config[CONF_MY_REQUIRED_KEY]))
Again, going into all the details of ESPHome code generation would be out-of-scope. However, ESPHome’s code generation is 99% syntactic sugar - and again it’s probably best to study other components and just copy what they do.
There’s one important concept for the to_code method: coroutines with yield.
First the problem that leads to coroutines: In ESPHome, components can declare (via cg.Pvariable) and access variables
(cg.get_variable()) - but sometimes when one part of the code base requests a variable
it has not been declared yet because the code for the component creating the variable has not run yet.
To allow for ID references, ESPHome uses so-called coroutines. When you see a yield statement
in a to_code method, ESPHome will call the provided method - and if that method needs to wait
for a variable to be declared first, yield will wait until that variable has been declared.
After that, yield returns and the method will execute on the next line.
Next, there’s a special method - cg.add - that you will often use. cg.add() does a very simple
thing: Any C++ declared in the parentheses of cg.add() will be added to the generated code.
If you do not call “add” a piece of code explicitly, it will not be added to the main.cpp file!
4. Runtime
Okay, the Python part of the codebase is now complete - now let’s talk about the C++ part of creating a new component.
The two major parts of any component roughly are:
Setup Phase
Run Phase
When you create a new component, your new component will inherit from Component.
That class has a special setup() method that will be called once to set up the component -
at the time the setup() method is called, all the setters generated by the Python codebase
have already run and the all fields are set for your class.
The setup() method should set up the communication interface for the component and check
if communication works (if not, it should call mark_failed()).
Again, look at examples of other components to learn more.
The next thing that will be called with your component is loop() (or update() for a
PollingComponent). In these methods you should retrieve the latest data from the
component and publish them with the provided methods. One thing to note in these methods
is that anything in loop() or setup() should not block. Specifically methods like
delay(10) should be avoided and delays above ~10ms are not permitted. The reason for this
is that ESPHome uses a central single-threaded loop for all components - if your component
blocks the whole loop will be slowed down.
Finally, your component should have a dump_config method that prints the user configuration.
5. Extras
Note
This serves as documentation for some of ESPHome’s internals and is not necessarily part of the development guide.
All Python modules have some magic symbols that will automatically be loaded by the ESPHome loader. These are:
CONFIG_SCHEMA: The configuration schema to validate the user config against.to_code: The function that will be called with the validated configuration and should create the necessary C++ source code.DEPENDENCIES: Mark the component to depend on other components. If the user hasn’t explicitly added these components in their configuration, a validation error will be generated.AUTO_LOAD: Automatically load a component if the user hasn’t added it manually.MULTI_CONF: Mark this component to accept an array of configurations. If this is an integer instead of a boolean, validation will only permit the given number of entries.CONFLICTS_WITH: Mark a list of components as conflicting with this component. If the user has one of them in the config, a validation error will be generated.ESP_PLATFORMS: Provide a list of allowed ESP types this component works with.CODEOWNERS: GitHub usernames or team names of people that are responsible for this component. You should add at least your GitHub username here, as well as anyone who helped you to write code that is being included.
Codebase Standards
Standard for the esphome-core codebase:
The C++ code style is based on the Google C++ Style Guide with a few modifications.
function, method and variable names are
lower_snake_caseclass/struct/enum names should be
UpperCamelCaseconstants should be
UPPER_SNAKE_CASEfields should be
protectedandlower_snake_case_with_trailing_underscore_(DO NOT use private)It’s preferred to use long variable/function names over short and non-descriptive ones.
All uses of class members and member functions should be prefixed with
this->to distinguish them from global functions in code review.Use two spaces, not tabs.
Using
#defines is discouraged and should be replaced with constants.Use
using type_t = int;instead oftypedef int type_t;
New components should dump their configuration using
ESP_LOGCONFIGat startup indump_config()ESPHome uses a unified formatting tool for all source files (but this tool can be difficult to install). When creating a new PR in GitHub, see the Github Actions output to see what formatting needs to be changed and what potential problems are detected.
The number of external libraries should be kept to a minimum. If the component you’re developing has a simple communication interface, please consider implementing the library natively in ESPHome.
This depends on the communication interface of course - if the library is directly working with pins or doesn’t do any I/O itself, it’s ok. However if it’s something like I²C, then ESPHome’s own communication abstractions should be used. Especially if the library accesses a global variable/state like
Wirethere’s a problem because then the component may not modular (i.e. not possible to create two instances of a component on one ESP)
Components must use the provided abstractions like
sensor,switchetc. Components should specifically not directly access other components like for example publish to MQTT topics.Implementations for new devices should contain reference links for the datasheet and other sample implementations.
Please test your changes :)
Note
You can also run the lint and Github Actions checks through a docker image:
# Full lint+test suite
docker run --rm -v "${PWD}/":/esphome -it ghcr.io/esphome/esphome-lint script/fulltest

# Run lint only over changed files
docker run --rm -v "${PWD}/":/esphome -it ghcr.io/esphome/esphome-lint script/quicklint
If you are using Windows and have docker installed the syntax is slightly different.
If you have cloned esphome to c:\edev\esphome the volume format is c/edev/esphome
# convert the volume format
$current_dir=(Get-Location).Path.ToLower().Replace(':','').Replace('\','/')
# Run lint only over changed files from powershell
docker run --rm -v "$($current_dir):/esphome" -it ghcr.io/esphome/esphome-lint script/quicklint
PRs are being drafted when changes are needed
If there have been changes requested to your PR, our bot will automatically mark your PR as a draft. This means that the PR is not ready to be merged or further reviewed for the moment.
Draft PRs tell other reviewers that look at the list of all PRs that this PR is currently in progress and doesn’t require their attention yet.
Once you have made the requested changes, you can mark the PR as ready for review again by clicking the “Ready for review button”:
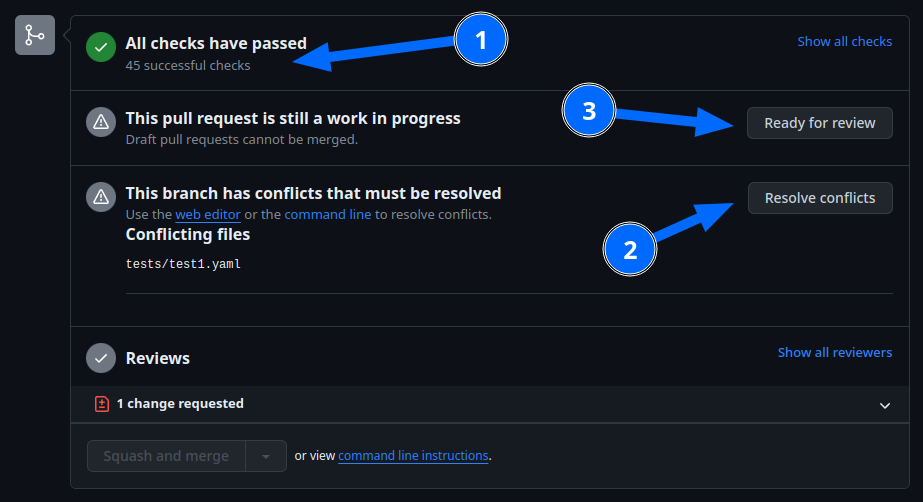
Before you click the “Ready for review” button, ensure you have addressed all requested changes, there are no merge conflicts, and that all our CI jobs and checks are passing successfully.
Once you’ve clicked the “Ready for review” button, the PR will return to a normal state again, and our bot will automatically notify the reviewers who requested the changes that the PR is ready to go!